Whale Watching

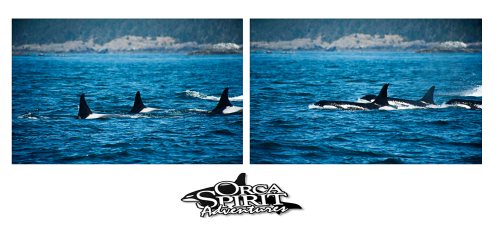
Earlier this summer I was hired to do some promo shooting for Orca Spirit, a Victoria bc whale watching company.

I wasnt really too sure of what to expect, weather wise, subject wise or even what sort of lens I wanted to use. Obviously I would need a fairly long lens, but given the pitching seas, I didn’t want anything too cumbersome as I was sure I would get unsharp images due to camera shake on anything excessive.

So what I settled with was the 70 -300, and later an 80-400mm 3.5 -5.6 . Now I figured I could give up the shallow depth from a 2.8 lens as I wanted a little more depth of field  just to guarantee more sharp images. Turns out it was a fair gamble as the whales proved to be very deceptive as to where and when they would surface.  In retrospect I wish I had a better lens with  focus limiters as the ones I brought with me were searching a lot and I missed lots of great opportunities . Also perhaps something in the 600 mm range would have been fun to play with, but salt water and camera gear is scary enough without taking out a mortgage to finance the shoot.

Still a fairly cool experience, up close  (but never close enough) with the resident orca pods of Vancouver Island.


Full breeches were a rarity on the trips we took, but on one fateful voyage in late afternoon we had this very playful orca to entertain us.


Leave a comment

Filed under Uncategorized

Late october Okanagan Wedding

A little sample of the Jewell Weeding that took place on oct 23 at the pyramid winery just outside of Kelowna bc. Great wedding , fantastic reception with lots of fun interior bc folk.  Carly and Eric have a staggeringly promising future ahead of them.

More on technique toward the bottom of this post.


Given the surroundings I thought we’d give the classic american gothic a try.

And of course we must have some detail and pre ceremony pics


And here is a little sneak peek behind the scenes showing my lovely assistant /voice activated lightstand that made the light possible


Both Carly and Eric are fitness freaks, with triathalons as their particular focus so we had to show that side too.

One last one


For what its worth all images were taken with a nikon d700, using either a 24-70 2.8 or 70 -200 2.8,  The light was an sb900 fairly consistently around the 1/16 power mark at a distance to subject of 3 to 5 feet. Shutter speed was always changing to accomodate available light but  I tried to stay above 1/100 while outside to make our subjects stand out from the back ground.  Many people thought this was a fantastic locale for photgraphy but being a commercial production winery I found many challenges in just trying to find clean backgrounds without powercables , forklifts or used production equipment lying around. Large vats would have been great but were not really doing the job as lots of clutter seemed to be everywhere.

Wedding photography is never easy as its very performance based and you dont have a lot of time to plan, I like to have a scout the day before and come up with some ideas but those ideas often go right out the window on the day due to the million variables that come with a wedding.

Having a great couple to work with makes everything a lot easier but they are often under a serious time constraint  and weather always seems to want to ruin  you…. I still had a great time and look forward to shooting more weddings in the future.


Leave a comment

Filed under Uncategorized

Truly Last Minute Maternity Photo.

This is Chelsea(and soon to arrive Darien), she went into labor about  12 hrs after this photo was taken.

This is Chesea and soon to be dad Mark. Good folks. Bright Future.

Coming soon…Darien

Cheers

d

Leave a comment

Filed under Uncategorized

Dining Room Portrait Studio

I have been pretty sad on the updates lately but I vow to change that, perhaps vow is too strong … how about I hope to change that. Yes that feels like a more attainable goal.

OK enough of that , lets get down to some photos and  how they were shot. I, like a lot of other photographers out there often have to shoot with no money, no studio , no assistants or any of the other lovely little bits that make a photogs life easier. It presents its own challenges and from these we learn, hell if we can deliver great results from  a meager starting point imagine what we can do with a full studio setup and support team.

A local vancouver Dj contacted me and was in need of some promo/bio pics and oh ya he is on a tight budget. I was only too happy to help out as it hopefully the promoters that hire him send other dj’s and the like my way when they see the results .

Now if this was for a large client with a tonne of cash,we could rent out a studio complete with lights and hire an assistant  and proceed to dazzle the world. Instead we convert my dining room into a mini studio, we decide on shooting against white and varying  the wardrobe and lighting to get what we can.

Below right is a shot of the general setup to give you an idea of how little you need to accomplish impressive results, now I wouldn’t try to use something this ghetto  for a high paying client as it would send them running for the door and you could probably see whatever value you built up in your brand plummet like the stocks of a certain oil company from across the pond.

But since we want to shoot, we shoot what and where we can. As you can see I have a sb 900 in a 42″shoot thru umbrella, a second sb600 on a stand behind the subject aimed at the white backdrop, both triggered by pocket wizards.

When we turned off the back light ,and bounced it off the wall to camera right we could change the bg from white to nice grey midtone which I think works well with the  vibrant colours of Dj Mambo’s Wardrobe.

This set up took about 5 mins to put together and once I sorted out my light power,( key light 1/16 bg light 1/4) we were banging off photos and having alot of fun. One good thing about shooting in this sort of environment is the distinct lack of stuffy formalities that can come with larger gigs.

I am fortunate enough to have a few c-stands and pocketwizards to help me along the way but as you can see the BG is not seamless white but rather a roll of leftover white fabric from a friends clothing line.

We make do with what we have and the satisfaction is huge.

Thanks for stopping by

D

Leave a comment

Filed under Uncategorized

High Noon Flame Out

I have  a unique character in my circle of friends , as I’m sure all of you do as well, but this guy , Corey Gauthier, has an incredible talent with an airbrush and has recently launched a new business called Millionaire Murals.  He  provides incredibly high grade custom paint-jobs for everything ranging from wake boards to  harley’s, vehicles and helicopters.

Corey recently had a commission to paint real fire on a convertible pt cruiser. Perhaps not the quintessential vehicle requiring a flamed out paintjob but he certainly knocked it out of the park anyway.

I have never shot  vehicles before so when Corey asked if I was interested I said, sure  lets see what I can do for you. Unfortunately time was of the essence as the car had to be delivered to the owner that evening, so my plan to shoot it in the early evening to twilight period was pushed aside and out we went to shoot in some harsh noon day type sun. Not exactly ideal but we all must learn to adapt as not every job is going to let you have the luxury of setting up lights and waiting for the ambient to come to a workable , complimentary level. So we tried out a few different locations around the shop and had some success as represented by these images.

I have to say the detail in the flames is incredible and the Geiger like rendering of a bmw x5 is also impressive. Next time I get the opportunity to shoot these kind of Paint jobs Im gonna insist on a different time of day so I can bring some drama to the overall scene . I cant wait for the next time as I anticipate a steady stream of incredible work to flow out of the Millionaire Murals shop.

Thanks for stopping by

D

Leave a comment

Filed under Uncategorized

Mixed Light Portraits

Alright, its been along time since I’ve posted anything and I’m feeling like less of a photographer for my lackadaisical ways. So I aim to remedy that with a nice little piece on shooting portraits using mixed light. In this case in particular a mix of natural and flash.

My aim is to create a well lit portrait that doesn’t a really have that “lit” look, not really going for heavy drama but more something along the subtle lines , something that might make people question if a light was even used .  If that question comes up  I believe we’ve accomplished our goal( unless of course it’s in reference to a poorly shot pic and in that case the sentence is a second round thru strobist’s lighting 101)

So pick a location, hopefully it has a backdrop of some interest or at least free of distractions. When in  doubt shoot against the sky or a good ole brick wall if nothing seems to present itself. What we want to do is find some open shade( shade that is near to an area of strong light) or perhaps an over cast day, or at least wait till the sun hides behind a heavy cloud.

Get your subject be it a family or model or puppy dog into position and remember to develop a rapport with them , get some laughs going  a little self deprecation goes along way,  just don’t over do it as the faith in your skills might just follow your humour down the tubes. Any way we’ll leave the developing rapport bit to a later post and concentrate on the light.

Depending on your location what we want to do is our light to nearly match out ambient level, maybe a stop or 2 over just to add pop but the closer it is to the light level of the immediate environment the more natural  and “unlit” the end result will be. Now this isn’t remedy for every situation, as Full noon sun beating down on your subject is going to take your small flashes and embarrass them into full power and slow recycle times and perhaps a little overheating , and perhaps you’ll get some good stuff but more likely you will still have squinty eyed racoon folk.

In this case I used my lovely backyard here in North Vancouver bc, put my parents and my son into place ,and as it was something like 330 in the afternoon on a sunny day, I waited for a cloud to come and help me out (in North Van clouds are anything but rare).In order to help my cause along a little further I placed my light (an sb900 in a 42 in shoot thru umbrella) to camera right  approx 4 feet away and tried to keep them in the shadow of the umbrella.I was using an 11 stop to give me the depth that would be required to keep my wiggling son in focus  and still hold my dad in the background. I believe a shutter speed of 1/160 gave me a decent level on my backdrop so I dialed in my flash to about a 1/4 power and popped a test frame, a little hot so I dialed in a 2/3 less power and a sense of calm washed over me… ok not really but I was in the right ball park. I wanted to give just a little bit more pop, so I took a 2nd flash (sb600 ), and went bushwaking in to the bg to place it  very precariously on a piece of driftwood. 1/4 power  15 ft away , bare flash. This gave me a little edge light and provided some seperation form the greenery.  A couple more pops and we were done  which was good cuz my old man was running low on beer  and the fun of a photoshoot was about to wear thin. All in all I think this took about 15 mins, 10 of which were spent waiting for the nuclear sun to hide behind some clouds.

Here is a shot from  earlier when the beverages weren’t in such short supply similar light no backlight tho.

Nothing cutting edge here, but something to keep in mind next time someone wants you to shoot something quick, and you don’t want to let the almighty  be your gaffer.

Thanks for stopping by.

D

Leave a comment

Filed under Uncategorized

How To Shoot A Virtual Tour

The Virtual Tour! An emerging niche that a lot of photographers have been trying to exploit lately, and a lot more are trying to wrap their heads around. Well we’re going to spill the beans about the proper way to shot , stitch and deliver these panoramic career builders.

What we’re going to discuss is a true panoramic shot in a professional manner, not to be confused with the one shot lens kits that you can pick up for 150 on any number of sites. Those have their purpose I’m just not sure what they are.. just kidding..sort of.

Ok so we have a tripod that will accept a panoramic head, which most will as long as they have A 3/8″ bolt  rising from the flange atop the legs. Sorry the $30 versions from best buy and the like won’t accept heads as they have one built in. I recommend Nodal Ninja,precision 360 or manfrotto . These heads allow you to rotate the lens around what is called the entrance pupil or nodal point.What that means is you can spin your camera to fully cover the entirety of a room and when you output your panorama you will have little or no parallax errors. Little aberrations where objects seem to split slightly or develop strange joints.

So we have our tripod and our Pano head now we need an appropriate lens. I recently have begun to use a 10.5 mm fisheye and shaved the shroud off. This allows me to get a complete 360 both vertically and horizontally in as little as 4 shots! That being said I still shoot 6. You can also use a 16 mm fisheye or for that matter any number of wide angle lenses, you just have to take more shots to cover the whole scene with a non fisheye. I have used the nikon 14-24 zom and get wonderfully clear results with no errors  when used in combination with a properly calibrated pano head. It just wasn’t good for workflow when having to process 36 pics instead of 6!

Calibrating the head is also very important, if you use a precision head or an r1 from Nodal ninja they come with rings set for each lens so the calibration is much simpler. A fully adjustable head is more complicated and I will refer you to john h’s site  for a nice tutorial on how to accomplish this feat.

Moving on, we have our tripod and pano head, our lens and camera body, I forgot to mention this is all based on the idea that we are using a dslr and in the examples shown a full frame nikon d3 was the instrument of choice. now we move on to the actual shooting of the the chosen area. Im using the kitchen in the above shot as my base  but the principles apply to almost all locations.

Exposure!  Now this can be tricky, we are shooting a complete 360 and chances are that the light is drastically different from one side of the room to the next. we cant use the exposure we get on the window for the dark cabinets as no camera in the planet has that kind of dynamic range. So we have a few choices, I like to pan the camera around and find a nice middle ground for the scene in all directions, sometimes a little under exposed sometimes a little over exposed  depending on windows, furniture wall color and the like. We can live with this middle ground exposure and carry on from here or we can bracket and squeeze some more range into our panorama later in the stitching and post process. which is what I did here but thats a whole other lecture.So the examples shown have a blown out window.Note these are shot with the aforementioned 10.5 mm shaved fisheye on a fullframe camera.

Stitching! Not exciting enough to warrant an exclamation mark but oh well. The program of choice is far and away PTGUI. It takes your images and basically hands you an equirectangular blended panorama with very little effort from you providing you have followed all the previous steps.

From here we bring our image into Photoshop and work our individual wonders to adjust things like contrast, colorbalance, sharpness and the like. At this point we have essentailly a complete 360 x180 image but more than likely we have an issue with the very bottom of the image,The dreaded Nadir! No worries though there is hope, I  personally use a strange workaround. I now open another pano program,  I know its getting ridiculous but what can I say? Pano2vr is the one I like to use . In pano2vr we bring in our pano, and click convert , select cube faces and within minutes we have 6 files.Within these files we can find our nadir, which we now bring into PS and repair to the best of our abilities . Once repaired simply flatten , save and return to Pano2vr to reassemble.Simply click select input <cubefaces <enter and sit back and watch as your pano reassembles itself.

We can now output our pano as a qtvr and view our virtual tour in all its glory .Qucktime is kind of a dead way to display this interactive rich media and I strongly recommend you look into a flash pano player like fpp,or krpano but that will also require some in depth flash knowledge and not something we’ll get into here.

Unfortunately I cannot embed the final result into this blog but I can redirect you here for a full flash presentation of the kitchen above and the house that encompasses it. Just scroll down and click the Virtual tour button.

Check out my earlier aerial pano post and take a look at some similar shots except from 1600feet in the air! That one throws more than just a few curveballs!

Most of the links I included are also excellent resources for more info on technique and gear.

Thanks for stopping by.

D

Leave a comment

Filed under Uncategorized

Measuring UP!

I have to think that all photographers suffer some form of esteem issue. Some kind of self doubt, the pounding question “am I good enough?”

I also have to assume that this is most prevalent in emerging or aspiring photographers who want to take their craft to a higher level and one day make it their sole source of income.

Gawd knows that this is definitely the case in my mind.In todays photo climate where Dslrs are cheaply available it seems that every third person is a photographer, we all know that is truly not the case but still we look and compare our work to theirs, and hopefully we can reaffirm our own talent and skill through these comparisons. Often times we discover that we are in fact grossly inferior to what seems like an infinite number of shooters. But sometimes we see that no, in fact I am good , I can deliver the goods consistently and to a standard that rises above the crowd.

It’s the same old adage , practice makes perfect,  you need to have the work to get better at the skill, and that can be the difference you see between yourself and other photographers.Perhaps they have a standby make-up artist or access to a full studio and professional models at their beck and call, and how do you measure up when your shooting someone responding to a free headshot posting from craigslist?

Well quite simply maybe you don’t, but that doesn’t mean you can’t deliver well thought out frames, perfectly exposed, wonderfully composed featuring a subject that is reacting to the photographer in a compelling and interesting way. We work within our means  and we cant always be comparing ourselves to the big dogs. I feel that by always trying to live up to the David Lachapelles , Joe Mcnally’s and Jeremy Cowarts of the world we do ourselves a disservice and need to look close to home in order to give a more valid assessment of our skills. Those guys are magnificent and by studying their effort we can begin to grow and attempt to also deliver images of that caliber.

Be honest with yourself, don’t settle for mediocre images if you know that with more effort you can make it better.The first frame is hardly ever the best one.

What is spurring this post is a recent critique I watched on Zach Arias‘ site. Now Zach gathers together, his wife, and on this particular critique a few other photographers, and  together they peruse several portfolio sites of photographers that want some input on their work.

I admire these people, because to submit their work to the scrutiny of Zach and his band of merry Newcastle drinkers is brave indeed. He is brutally honest, something we all need in order to properly move forward in our career. I have watched all his critiques and find I agree with most of his assessments. On occasion he can be crushing, and probably the site in question necessitates such grades but all the same it makes me empathetic with the submitted photographer and begin to doubt my own work as well.

I have yet to submit my site for critique, but with each one I watch I re-examine my own work and try to honestly assess what it is I am looking at, and if it’s not something I would want critiqued  I remove it, and make a mental note to reapproach the subject with higher expectations

Im not sure if we as artists will ever truly be satisfied with our own work, but we do need to be honest with ourselves, and in our efforts to improve perhaps we can develop a thicker skin in the face of comparison and in the eyes of our own worst critic, ourselves.

thanks for stopping  by

D

Leave a comment

Filed under Uncategorized

Shooting Show Homes in HDR

Recently the wonderful world of Home Lotteries has given me the opportunity to expand my skill set and provided some incredible locations to shoot.I am incredibly grateful for the opportunity to shoot these magnificent homes completely furnished and staged. Starting with great subject matter helps tremendously. Check out these sites for complete virtual tours of the properties featured in this post. Foothills Hospital Home lottery. Kinsmen Home Lottery.

Often in our career as photographers we’ll be approached to shoot a home or some other residential or commercial building. Sometimes it’ll be for a friend or a realtor looking to market a potential listing. Now shooting real estate or architectural images sounds like a pretty easy and straightforward thing to accomplish and that is often how most people approach it. Simple – show up point and click , post and await sale or accolades for such fine effort and artistic interpretation of the scene.

What many people don’t realize , like so many other aspects of photography is that there are certain rules to consider and perhaps special gear to utilize in order to best deliver the required result.

First off we need a nice wide angle lens, the wider the better , I like to use  the nikon 14 -24 mm lens , this gives me ample range to allow a wide perspective  without a whole lot of distortion.  Tilt and shift lenses are also really popular with career architectural and  landscape photogs as it allows you to shift perspective to remove distortion and keep vertical lines , well vertical.

Also lighting is something that is of huge consideration, you can accomplish this with a tonne of studio lights and a busload of assistants or you can follow in the footsteps of renowned  real estate photographer Scott Hargis and use speedlights.

What I want to blog on about today is the use of subtle HDR techniques to accomplish a very pleasing result without having a bunch of lights and assistants. I know there are a tonne of haters out there willing to weigh in the the HDR subject, and I agree with them for the most part, but I believe this technique has a place in the world of photography and is here to stay. For some great tutorials on how to shoot HDR check out Trey Ratcliff’s site .

As always we need to think compositionally when approaching these real estate or architectural projects. We want nice verticals, leading lines  to direct our viewers eye to interesting subjects and perhaps some symmetry thrown in for good measure. I also like to shot through doorways and include a piece of the doorframe ,  I find it adds some depth and perspective to the scene. Before you settle in to start shooting have a look around, perhaps the table could use a wipe or this plant would work better 2 feet to the left or maybe this whole chair should be removed entirely. It all changes from room to room and  generally gets easier the more you shoot.

Still with me? Good, now for the HDR stuff. For the HDR newbie we need a tripod and we need to bracket some exposures. I like to shoot from 5 -7 exposures and then select 3-5 exposures for blending purposes. I typically use my “normal” exposure plus  the -2,+2, -4,+4 brackets depending on the scenario. I flip flop in which software I use to merge and tonemap the image, swapping from Photomatix to Photoshop seemingly depending on the wind. But for today’s purposes we’ll be referring to Photomatix. I know that CS5 has a great new HDR feature but I haven’t used it yet so we’ll just pretend it doesn’t exist at this point.

So we have photos merged and brought into Photomatix  and  I want to go for a subtle look not some garish , over saturated, grunge version that is very popular , and has its place but definitely not in the world of Luxury show homes. We click the tonemap button and are presented with a set of sliders I like to begin with  a compression of 100, color saturation around 70 or so,Adjust the luminosity  to taste usually +1-5. in the Microcontrast in the 4-6 range as well.

Smoothing is where we control the grungyness or natural feel of the photo so I either keep it in the mid or high setting. The rest of the sliders vary depending on how bright or dark you want you photo so experiment and see what you like . I find the microsmoothing slider useful for adding texture and a 3d feel but be careful as you can bring a lot of noise into your image.

Alright we now have a tonemapped image and it looks great! Just kidding often we have a flat kinda meh looking image at this point, so now we go into Photoshop to bring some pop to out image.

I like to use a lot of adjustment layers , in particular curves  to add contrast to certain areas and lighten or darken others. I always over do the adjustment I’m trying to accomplish (it helps me fine tune) then invert the mask and paint in the area that I want affected, and then further control the effect using my opacity slider. Some filters and options may not be available to you at this point so we want to convert our image to an 8 bit  by going image<mode<8bit.

Nik software has some truly wonderful filters out there that  go along way to helping add some additional texture without going over the top . Be sure check them out.

Sharpening can also have a profound effect on your image , and often I like to use a high-pass filter combined with a softlight blend mode to add some zing. Always utilizing a mask and my opacity slider to contain anything I feel is going a little extreme. For other  issues such as noisy shadows, strange color aberrations, or ghosting  I will often place one of my original brackets over the image in a new layer and using a mask paint out the offending region.

Thats pretty much it! I realize that this doesn’t have a complete a-z breakdown but in text form it seems like I’ll be writing something of biblical proportions and how many of you actually want to suffer through my writing for that long. Perhaps video tutorials will be forthcoming but no promises yet.

Thanks for stopping by

D

Leave a comment

Filed under Uncategorized

shooting wine bottles on a budget

We’ve all seen the photos, you know the bottle centre stage , not looking too complicated but something about it just lets the image sing.

Often times the little something that provides the impact is the long highlight running the length of the bottle , giving it shape , dimension and  maybe even a little distinction. This highlight is usually delivered  using a strobe in a stripbank, or some other form of strip light that gives a nice specular highlight. The problem is that these wonderful light accessories cost money, and the price varies from actually not bad $150 to the garish $600. You typically get what you pay for , but what I want to do is demonstrate a way to cheat the stripbank gods and thumb my nose at the cost of it all by delivering a classic wine bottle shot for nothing. Providing of course that we have 2 speedlights and  a way to trigger them off camera.

So we begin by picking a wine bottle, its best if the labels line up nicely and there are no tears or wear on the label or cork wrap. But for our purposes whatever wine bottle is handy will do, but the intent of shooting the perfect bottle  begins with a nice unblemished bottle so give a cleaning using windex or other glass cleaner to get rid of ny fingerprints, that being said I probably could have used my own advice as I see a blemish on the accompanying photo, but enough  of that.

So we have a pristine (ahem) bottle and we are ready to begin setting up. In this shot i pulled a painting off my wall and leaned up against a chair. I put 1 sb6oo on another chair about 1 foot away , placed a homemade cardboard snoot on it, power level around 1/8 and aimed it to hit somewhere in the middle of the painting.

Next I placed the bottle on my table about 5 feet in front of the bg. I then bring in my ultra fancy strip light, which is a box about the same height as the bottle with a piece of  regular ole printing paper taped to it. Nothing miraculous here.  I place my second flash a sb900 in front of the bottle camera right aimed to hit the box and paper . Power level set to 1/8 ,as well I flag the light from hitting the camera right side of my bottle using a  piece of black coreplast that I found lying around, feel free to use better suited gear if available to you but the point of this post is to get good results with no extra investment.

I found the right side of the bottle to be a little too dark for my liking so I brought in a second high end stripbank, this time in the form of a book (dictionary actually) and proceeded to tape more white paper to it. I placed this close to the bottle, probably 5 inches or so just out of frame.  This is bringing me pretty close to what I had in mind when I began the process, but the top right side of the bottle still lack the detail I was hoping to get. Sooo in comes another piece of paper folded in half and placed on top of the dictionary…  err… stripbank.

Now we are really getting close to my original vision, the only problem is the table in front of the bottle is too bright so I placed another book in front of the camera right flash keeping the light of the foreground table. Unfortunately my set up shot doesn’t have this final touch in the frame but I believe you  get the jist.

I suppose having the camera settings might be helpful in recreating this shot, and they were as such:

manual mode

1/200 shutter

3.5 f stop

both flashes set 1/8th power.

Here is the setup in all its glory.

Now we have a nicely presented wine bottle, shot with a minimal amount of gear. Using our knowledge of light and how it works to get around the roadblocks (expense) of creativity.  This basic application can be used for all sorts of reflective objects, try backlighting or placing the bottle on a glass table and shooting up through it, keep experimenting and researching and your photographs will be all the better for it.

Thanks for stopping by

D

Leave a comment

Filed under Uncategorized